Creating a table
If you want to create a table in FCKeditor you must press the "Insert/Edit Table" ![]() button on the toolbar.
button on the toolbar.
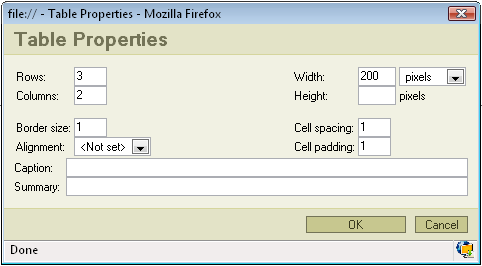
After that a popup window called "Table Properties" will appear.
- Rows: in this field you specify how many rows do you want to have in your table .
- Columns: in this field you specify how many columns do you want your table to have.
- Border size: sets the thickness of the tables border.
- Alignment: specifies the alignment of your table. You can set it to left, center or right.
- Width: sets the width of you table in pixels or percentage. E.g. if you choose 40 percent the table will take 40% of the editing area width.
- Cell spacing: specifies how thick will the cells border be.
- Cell padding: sets the hight of the cell.
- Caption: specifies the title of your table. The title will appear in the top of the table.
- Summary: sets a comment on the table. The comment will not appear in the table. It is only for usage.
Not all of the options are required to build a table. You have to fill only Rows and Columns. Rest of the fields are optional and you may use them depending on your needs.
Working with the table
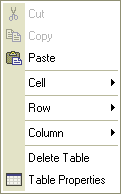
If you created your table you may change its properties. Point your mouse on the table press the right button and a context menu will appear.
In order to change the tables properties press "Table Properties" and a popup window will appear. It's the same windows that you used for creating the table.
If you want to delete you table simply press "Delete Table".
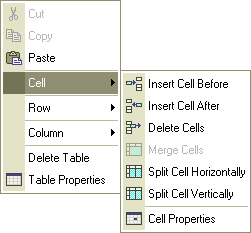
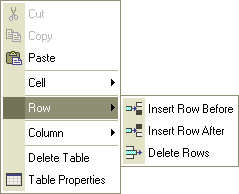
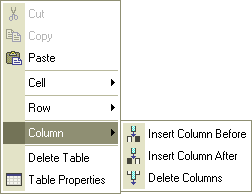
The other three options are Cell, Row and Column. If you point your mouse cursor on one of them a new context menu will appear.
Cell
- Insert Cell Before: inserts a new cell before the cell your cursor is currently in.
- Insert Cell After: inserts a new cell after the cell your cursor is currently in.
- Delete Cells: deletes the cell your cursor is in. You may also highlight more cells and than delete them.
- Merge Cells: merges cells you have highlighted into a one cell.
- Split Cell Horizontally: splits a cell in two.One cell is split in two colums.
- Split Cell Vertically:splits a cell in two.One cells is split in two rows.
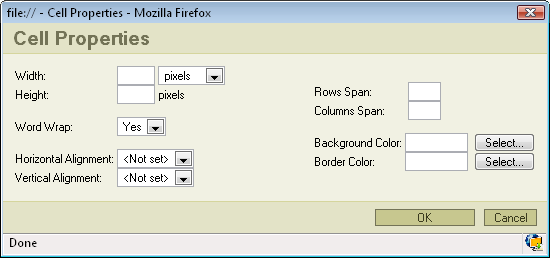
- Cell properties: if you click the cell properties a new popup window called "Cell Properties" will appear:
- Width: sets the cell width in pixels or in percentage of the table width.
- Height: sets the height of the cell.
- Word Wrap: turns on/off word wrapping.
- Horizontal Alignment:determines the horizontal alignment of the text in your cell. It can be set to Left, Center or Right.
- Vertical Alignment: determines the vertical alignment of the text in your cell. It can be set to Top, Middle, Bottom or Baseline.
- Rows span: extends vertical rows.
- Columns span:extends cells on a horizontal row (left and right).
- Background color: sets the background color of your cell. You can either select a color or type it manually.
- Border Color: sets the color of your cells border. You can either select a color or type it manually.
Row
- Insert Row Before: inserts a new row before the row your cursor is currently in.
- Insert Row After: inserts a new row after the row your cursor is currently in.
- Delete Rows: deletes highlighted rows or the row your cursor is currently in.
Column
- Insert Column Before: inserts a column before the column your cursor is currently in.
- Insert Column After: inserts a column after the column your cursor is currently in.
- Delete Columns: deletes highlighted columns or the column your cursor is currently in.
